Saturday, January 29, 2011

Malaysia SharePoint User Group (MySpug), Where Are You?

Today, I realise that MySpug (http://spugmalaysia.org) web site no longer exist – rather a sad news to all SharePoint end-users, IT pros and developers in Malaysia.

spugdead

MySpug was launched in mid 2009 and surprisingly I knew nothing about their existence until today! That’s sound weird, eh? considering that I’ve been working around SharePoint since version 2001. My friend said they had organised quite a number of activities and talks in Malaysia (but I didn’t get any invitation *sigh* – why?? communication break down?? publicity??). I am not sure whether MySpug is still active though – I will have to find out.

Come on and Matthew Khaw and Patrick Yong!

Site Settings Display A Blank Page

When you use standard hostname given to the address of the loopback network interface, “localhost”, as URL to access the SharePoint Site Settings page of any sub sites for example: http://localhost/subsite1/_layouts/settings.aspx, a blank page will be displayed and the following entries will be logged in the SharePoint ULS:

  • 01/29/2011 18:43:04.10 | w3wp.exe | (0x1CB4) | 0x1DDC | SharePoint Foundation | Logging Correlation Data | Name=Request (GET:http://<<SERVERNAME>>:80/<<SUBSITE>>/_layouts/settings.aspx)
  • 01/29/2011 18:43:04.11 | w3wp.exe | (0x1CB4) | 0x1DDC | SharePoint Foundation | Monitoring | Leaving Monitored Scope (Request (GET:http://<<SERVERNAME>>:80/<<SUBSITE>>/_layouts/settings.aspx)). Execution Time=1.96949915988322
  • 01/29/2011 18:43:04.11 | w3wp.exe | (0x1CB4) | 0x1F24 | SharePoint Foundation | Configuration | Alternate access mappings have not been configured.  Users or services are accessing the site http://<<SERVERNAME>> with the URL http://localhost.  This may cause incorrect links to be stored or returned to users.  If this is expected, add the URL http://localhost as an AAM response URL.  For more information, see: http://go.microsoft.com/fwlink/?LinkId=114854"/>    

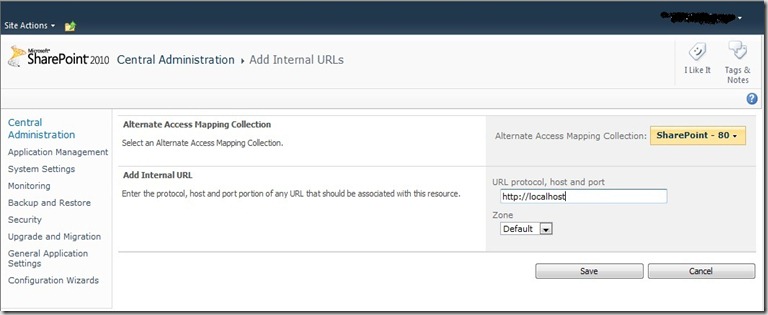
To fix this issue, all you need to do is to configure Alternate Access Mappings (AAM) by adding internal URLs “http://localhost” to the default zone as shown in screenshot below:

AAM

Friday, January 28, 2011

Command To Start and Stop Windows Services For SharePoint

If you like me who prefer Windows 7 x64 as your SharePoint 2010 development environment, most probably the following batch files would be useful to start and stop Windows Services for SharePoint when required:

Start Windows Services For SharePoint

REM Start SharePoint 2010 Services : http://sharepointmalaya.blogspot.com

Echo Starting Services Required To Run SharePoint 2010

NET START MSSQL$SHAREPOINT
NET START IISADMIN
NET START W3SVC
NET START SPAdminV4
NET START SPTimerV4
NET START SPTraceV4
NET START SPUserCodeV4
NET START SPWriterV4
NET START OSearch14

pause

Stop Windows Services For SharePoint

REM Stop SharePoint 2010 Services : http://sharepointmalaya.blogspot.com

Echo Stoping Services Required To Run SharePoint 2010

NET STOP OSearch14
NET STOP SPWriterV4
NET STOP SPUserCodeV4
NET STOP SPTraceV4
NET STOP SPTimerV4
NET STOP SPAdminV4
NET STOP W3SVC
NET STOP IISADMIN
NET STOP MSSQL$SHAREPOINT

pause

Thursday, January 20, 2011

View SharePoint Content and Settings From Visual Studio 2010

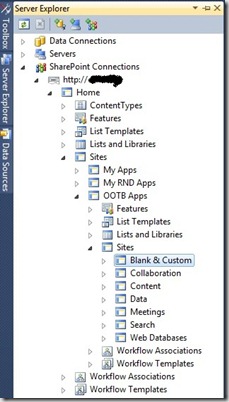
One of coolest and newest features of Visual Studio 2010 is the ability to view SharePoint Content and Settings from Server Explorer.

ServerExplorer

To do this you are require to launch Visual Studio as an administrator. Locate the “Microsoft Visual Studio 2010” shortcut in the Start menu under All Programs > Microsoft Visual Studio 2010. Right click on the Microsoft Visual Studio 2010 shortcut and choose “Run as administrator” from the context menu.

Alternatively, if you just want to make Visual Studio start up with administrator privileges every time you launch it, you can change the
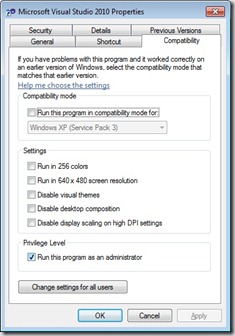
Microsoft Visual Studio 2010 shortcut properties to always run as administrator. To do this, right click on the Microsoft Visual Studio 2010 shortcut and choose Properties. Click the Compatibility tab and then check the “Run this program as an administrator” check box and
press OK.

VisualStudioSettings

Wednesday, January 19, 2011

How to Ensure a Full Farm Recovery

SharePoint 2010 stores more configuration information in the content databases than SharePoint 2007, but you still need to be concerned with the following non-SharePoint components to ensure a successful farm recovery:

SharePoint Root

The \Program Files\Common Files\Microsoft Shared\Web server Extensions\14 folder often holds any customizations that your developers have made to your SharePoint implementation. These can include custom graphics, style sheets, and site definitions, to name a few possible modifications. It is important to back up the SharePoint Root on at least one of your Web front-end servers to ensure that these customizations can be recovered. Because the SharePoint Root should be identical on all Web front-end servers, it is not necessary to back up each one separately – makes a lot more easier.

Inetpub folder

This is another location that can be used to store customizations such as graphics and custom Web Parts. You also want to ensure that you have a copy of the Web.config file, because this contains any safe control entries required by custom or third-party Web Parts. Each Web application has a corresponding Inetpub folder on your Web front-end servers, so back up all!

System Binaries

In the event of server failure, you need to recover it to the state it was in before the failure. This can be done either by reinstalling all the system files, patches, service packs, and upgrades that were installed on the server, or by restoring your system files from backup. Often, backup utilities offer a disaster recovery option designed to recover your system to the exact state before the failure.

IIS Settings

SharePoint relies on Web sites hosted by Microsoft Internet Information Server (IIS) to provide access to SharePoint information. It is therefore important that you have a backup of the IIS configurations for the SharePoint servers in the farm. You can do this by opening the IIS Management console from Administrative Tools on the Start menu, right-clicking the server object, selecting All Tasks >  Backup/Restore Configuration option.

To back up the IIS configuration information, use the AppCmd.exe command found in %WinDir%\System32\Inetsrv as shown here.

appcmd.exe add backup "Your Backup Name"

To restore that backup, run the command shown here.

appcmd.exe restore backup "Your Backup Name"

SSL Certificates

You should always keep a backup of your SSL certificates, including the private key. Although this can be retrieved from a system state operating system backup, you must restore the entire system state to access the certificate store that was backed up using Certificate Manager. A configuration backup should always include the use of a password so that the restore is portable and not restricted to the original Web server.

System State Data

System state data includes the following items, which can be backed up by most disaster-recovery software as part of a normal system backup.

  • Start-up files
  • Registry
  • COM+ class registration database
  • IIS configuration
  • Active Directory
  • SYSVOL folder
  • DNS
  • Certificate store

DNS Records

If your DNS server is hosted on a domain controller, the system state data will include the DNS information. If DNS is hosted on a member server or stand-alone server, however, you must back up the Zonename.dns file located at C:\Windows\System32\DNS.

SharePoint 2010 Disaster Recovery Tools

SharePoint 2010 provides several tools to assist in backing up and restoring your SharePoint content, and you will use a combination of them for complete protection. Test each tool available to you within your environment and see what combination of tools works best with your disaster recovery plan.

The following tools and provides information on how and when to use them:

Versioning

This functionality is disabled by default, but after enabling it, you can restore a previous version of a document from within that library as shown in figure below.

VersionHistory

Versioning does not protect content; it only preserves history by creating copies of content each time it is saved. If a document is deleted, it must be recovered from the Recycle Bin.

Two-stage Recycle Bin

SharePoint 2010 includes a two-stage, first-in/first-out Recycle Bin that allows for a second level of retention before content is permanently deleted from the system. By default, after a user deletes an item and then empties their user-level Recycle Bin, the items are retained in the second stage Recycle Bin for 30 days.

Site collection administrators have access to a global view of the Recycle Bin (see figure below) that includes items deleted by all of the end users and allows the administrator to recover items that have been deleted by other users without affecting the value in the Modified By column.

RecycleBin

Central Administration

SharePoint 2010 Central Administration Backup And Restore interface gives you the ability to perform several types of backups and restores, including:

  • Entire farm
  • Farm configuration only
  • Service applications
  • Web applications
  • Content databases
  • Site collections
  • Sites
  • Lists and libraries
Windows PowerShell

SharePoint 2010 Management Shell provides you with a more flexible and dynamic way to perform backups and restores of your SharePoint information. For more information on STSADM commands, see SharePoint 2010 Backup and Restore using Powershell.

STSADM

The STSADM command-line utility also provides functionality to perform backups of the same components as Windows PowerShell does. For more information on STSADM commands, see SharePoint 2010 Farm Backup and Restore using STSADM.

SQL Server

You can also have SharePoint information backed up by your SQL Server administrators or backup operators from within SQL Server. Similar to performing SharePoint backups, SQL Server backups can be performed using a graphical user interface called SQL Server Management Studio.

Read-only content databases

SharePoint 2010 introduces the capability of recognizing content databases that have been set to read-only in SQL Server. This can be helpful during a disaster recovery to prevent changes from being made to the content during the recovery. The procedure to set the database to read-only can be performed using either SQL Server Management Studio or a T-SQL ALTER DATABASE statement.

Unattached content databases

SharePoint 2010 introduces the capability to access databases that are available in SQL Server but aren’t currently part of the farm. This allows you to perform granular restores of SharePoint content using SharePoint. Accessing unattached content databases will allow SharePoint administrators to connect to read-only content databases, restored SharePoint content databases, and content database snapshots. You are able to restore site collections, sites, libraries, and lists from these unattached content databases.

Tuesday, January 18, 2011

SharePoint STSADM Backup and Restore Commands

The following are examples of different STSADM commands you can use to back up and restore various components of your SharePoint environment.

A full farm backup followed by a restore:

stsadm -o backup -url http://app01/ -directory \\app01\sharepointbackups -BackupMethod Full -Quiet
stsadm -o restore -url http://app01/ -filename \\app01\sharepointbackups –Overwrite

Back up and restore configuration information only:

stsadm -o backup -url http://app01 -directory \\app01\sharepointbackups -configurationonly -quiet
stsadm -o restore -url http://app01 -filename \\app01\sharepointbackups -configurationonly –quiet

Back up and restore a service application:

stsadm -o backup -directory \\app01\sharepointbackups -quiet -backupmethod full -item "Excel Services"
stsadm -o restore -directory \\app01\sharepointbackups -item "Excel Services" –quiet

Back up and restore a site collection:

stsadm -o backup -url http://app01/portalsitecollection -filename \\app01\SharePointBackups\portalsitecollection.bak -overwrite
stsadm -o restore -url http://app01/portalsitecollection -filename \\app01\SharePointBackups\portalsitecollection.bak –overwrite

Export and import a subsite, list, or library:

stsadm -o export –url http://app01/sites/contosoportal/Shared%20documents –filename \\app01\sharepointbackups\SD.bak -quiet -overwrite
stsadm -o import –url http://app01/sites/contosoportal/Shared%20documents –filename \\app01\sharepointbackups\SD.bak -quiet

See also example of performing a SharePoint 2010 Backup and Restore using Powershell.

Monday, January 17, 2011

SharePoint PowerShell Backup and Restore Commands

The following are examples of different SharePoint PowerShell commands you can use to back up and restore various components of your SharePoint environment.

A complete farm backup followed by a restore:

Backup-SPFarm –Directory \\App01\SharePointBackups -BackupMethod Full
Restore-SPFarm –Directory \\App01\SharePointBackups -RestoreMethod New

Back up and restore a service application:

Backup-SPFarm –Directory \\App01\SharePointBackups -BackupMethod Full –Item "Excel Services"
Restore-SPFarm –Directory \\App01\SharePointBackups -RestoreMethod New –Item "Excel Services"

Back up and restore farm configuration information only:

Backup-SPConfigurationDatabase –Directory \\App01\SharePointBackups
Restore-SPFarm –Directory \\App01\SharePointBackups –RestoreMethod Overwrite –ConfigurationOnly

Back up and restore your SharePoint content databases:

Backup-SPFarm –Directory \\App01\SharePointBackups -BackupMethod Full –Item ContosoPortal
Restore-SPFarm –Directory \\App01\SharePointBackups -RestoreMethod New –Item ContosoPortal

Back up and restore a site collection:

Backup-SPSite –Identity http://App01/Sites/ContosoPortal -Path \\App01\SharePointBackups\PortalSiteCollection.bak -Force
Restore-SPSite –Identity http://App01/Sites/ContosoPortal -Path \\App01\SharePointBackups\PortalSiteCollection.bak –Force

Export and import a subsite, list, or library:

Export-SPWeb –Identity http://App01/Sites/ContosoPortal/ -Path \\App01\SharePointBackups\SharedDocuments.bak -Itemurl "Shared Documents" -Force
Import-SPWeb –Identity http://App01/Sites/ContosoPortal/ -Path \\App01\SharePointBackups\SharedDocuments.bak –Force -IncludeUserSecurity

See also example of performing a SharePoint 2010 Farm Backup and Restore using STSADM.

Sunday, January 16, 2011

SharePoint 2010 Products Configuration Wizard - Text Error

This is not a big deal! I found a text error (missing white space) in SharePoint 2010 Products Configuration Wizard Smile

SharePointWizardErrorCaption

Saturday, January 15, 2011

My Useful SharePoint 2010 Resources

Understanding the Basics of Collaboration in SharePoint 2010

Understanding the Architecture of SharePoint 2010

Optimizing SQL Server for a SharePoint 2010 Implementation

Installing SharePoint 2010

Using Windows PowerShell to Perform and Automate Farm Administrative Tasks

Organizing Information

Collaboration and Portals

Search Server 2010 and FAST Search: Architecture and Administration

Using Windows PowerShell to Manage Search Services and FAST Search

Customizing the Search Results and Search Center

Administering Web Content Management and Publishing

Securing Information

Aggregating External Data Sources

Web Parts and Their Functionality in SharePoint 2010

Publishing SharePoint 2010 to Mobile Devices

Business Intelligence, Reporting Services, and PerformancePoint Services

Upgrading to SharePoint 2010

Sunday, January 9, 2011

PowerShell for SharePoint

First things first. Where can we find PowerShell? When running on a SharePoint server, two possibilities exist: either select the SharePoint 2010 Management Shell from the Start menu or open a command prompt and enter the following:

PowerShell

If we’re using the SharePoint management shell, the SharePoint snap-in will already be installed. If we’re using a standard PowerShell console, we can install the snap-in by entering the following command:

Add-PSSnapIn Microsoft.SharePoint.PowerShell

We can check the list of installed snap-ins by using this command:

Get-PSSnapIn


Connecting to SharePoint Remotely

We can open a PowerShell session on a client machine and then use remoting to connect to a SharePoint server. To enable remoting on the server, enter the following command:

Enable-PSRemoting
 
This command will enable the WinRM service and set up the firewall to allow incoming sessions. Now, we can connect from any client machine by entering the following command:
 
Enter-PSSession "Server Name" -Credential (Get-Credential)
 

PowerShell Permissions

 
To use SharePoint cmdlets, a user must be a member of the SharePoint_Shell_Access role for the farm configuration database as well as a member of the WSS_ADMIN_WPG group on the SharePoint front-end server. To grant users the appropriate permissions, use the
following command:
 

Add-SPShellAdmin -Username domain\username -database (Get-SPContentDatabase-webapplication http://weburl)


Working with Site Collections and Sites

 
Most of the cmdlets commonly used in the management of site collections or sites end in SPSite or SPWeb. To pick up a reference to a site collection, we can use the following:
$site=Get-SPSite -Identity http://siteurl
 
Or we can return a list of all site collections by using this:
 
Get-SPSite

When it comes to managing site objects (SPWeb), we can pick up a specific web site using this:
 
Get-SPWeb -Site http://SiteUrl

or

Get-SPWeb -Site $site


Creating Site Collections and Sites

Create a new site collection using the New-SPSite cmdlet:

New-SPSite -Url http://localhost/Sites/NewSiteCollection - OwnerAlias username

Add new sites using the New-SPWeb cmdlet: 


Deleting Site Collections and Sites


We can delete site collections and sites by using the Remove-SPSite or the Remove-SPWeb cmdlet.


or


Setting Properties on SharePoint Objects


$web=SP-GetSPWeb -Identity http://myweburl
$web.Title="My New Title"
$web.Update()


Working with Lists and Libraries

Enumerate the lists on a site using the following:

Get-SPWeb -Identity http://myweburl | Select -Expand lists| Select Title

Add new lists using the Add method of the Lists property:

Get-SPWeb -Identity http://myweburl | ForEach {$_.Lists.Add("My Task List", "",$_.ListTemplates["Tasks"])}


Working with Content


Retrieve a list of all items in a site using the following:

Get-SPWeb -Identity http://myweburl | Select -Expand Lists | Select -Expand Items | select Name, Url

Apply a filter to show only documents:

Get-SPWeb -Identity http://myweburl | Select -Expand Lists | Where {$_.BaseType -eq "DocumentLibrary"} | Select -Expand Items | select Name, Url

Use of filters to search for a specific item:

Get-SPWeb -Identity http://myweburl | Select -Expand Lists | Select -Expand Items | Where {$_.Name -like "foo*"} | select Name, Url


Creating New Documents

To create a new document in a document library, use the following:

function New-SPFile($WebUrl, $ListName, $DocumentName,$Content)
{
$stream = new-object System.IO.MemoryStream
$writer = new-object System.IO.StreamWriter($stream)
$writer.Write($content)
$writer.Flush()
$list=(Get-SPWeb $WebUrl).Lists.TryGetList($ListName)
$file=$list.RootFolder.Files.Add($DocumentName, $stream,$true)
$file.Update()
}
New-SPFile -WebUrl "http://myweburl" -ListName "Shared Documents" -DocumentName "PowerShellDocument.txt" -Content "Document Content"


Working with Timer Jobs

Get a list of all timer jobs:

Get-SPTimerJob

Or we can get a list of job failures grouped by the job name:

Get-SPTimerJob | Select -Expand HistoryEntries | Where {$_.Status -ne "Succeeded"} | group JobDefinitionTitle

Saturday, January 8, 2011

Renaming The Central Administration Database

Unless you perform a command-line installation, by default SharePoint Central Administration site uses database name with a Globally Unique Identifier (GUID), for example: SharePoint_AdminContent_<GUID>. If you like to rename the Central Administration Database, you can follow these steps but with extreme caution Winking smile:

  • Log on to your SQL Server with an account that has full access; ideally, you should use the same account that you used for your SharePoint installation.
  • Open the SQL Server Management Studio interface and locate the SQL Server instance that contains your Central Administration database, for example: SharePoint_AdminContent_<GUID>. Right-click the database name and choose the Rename command from the shortcut menu to enter edit mode. Then press Ctrl+C to copy the existing name of the database for later use.
  • Back up the existing SharePoint_AdminContent_<GUID> database by right-clicking the name of the database and then selecting the Tasks command.
  • When you have successfully backed up the database, restore the information from the backup that you just performed to a new database having a user-friendly database name such as CentralAdmin_Content_SharePointMalayaDB.
  • Open SharePoint Central Administration. Under Application Management, click Manage Content Databases.
    • Select the SharePoint Central Administration v4 Web application using the Web application drop-down list.
    • Click the old database name, SharePoint_AdminContent_<GUID>.
    • Use the Database status drop-down option to change the status from Ready to Offline.
    • Do not select the option to remove the content database.
    • Click OK.
  • Log on to the SharePoint server using the account that was used to provision the database. Usually this is the service user account that you configured SharePoint with when you provisioned the content databases during the installation of SharePoint 2010.
  • After opening the command prompt, perform the following steps.
    • Type cd C:\Program Files\Common Files\Microsoft Shared\Web server extensions\14\BIN\ to change the directory to the SharePoint 2010 root so you can run the STSADM commands.
    • Delete the original Central Administration database, the one with the GUID that you copied earlier, using the following command:

      stsadm -o deletecontentdb -url http://UrlOfYourCentralAdministration:portnumber –databasename SharePoint_AdminContent_<GUID> -databaseserver NamedInstanceOfYourSqlServer

    • Associate the newly created database with your Central Administration using the following STSADM command:

      stsadm -o addcontentdb -url http:// UrlOfYourCentralAdministration:portnumber -databasename SharePoint_AdminContent_SharePointMalayaDB -databaseserver NamedInstanceOfYourSqlServer

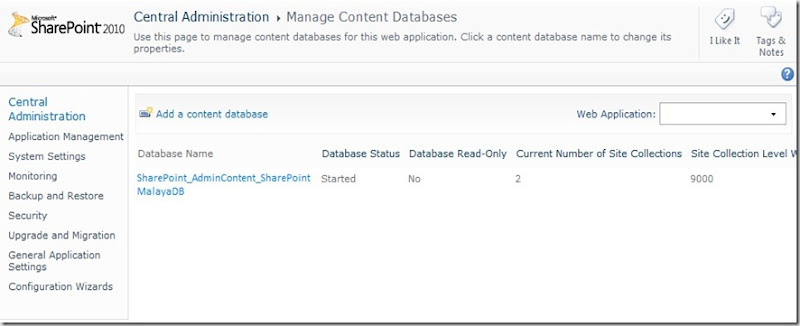
  • Return to SharePoint Central Administration. Under Application Management, click Manage Content Databases and refresh the page to verify that your Central Administration database reflects the new database name.
  • If you see a database with the SharePoint_AdminContent_SharePointMalayaDB name, you can then be sure that the original Central Administration database is backed up, and you can delete it from SQL Server.

CentralAdministrationDBRename

Tuesday, January 4, 2011

Write Error Logging Entries To The SharePoint Unified Logging Service (ULS) Logs

All SharePoint exceptions are derived from the SPException class. We can write error logging entries to the SharePoint Unified Logging Service (ULS) logs by using code similar to the following sample:

using Microsoft.SharePoint.Administration;
 

try
{
    // Some code
}
catch (Exception ex)
{
    // Create diagnostics category
    SPDiagnosticsCategory oCat = new SPDiagnosticsCategory("A new category", TraceSeverity.Monitorable, EventSeverity.Error);
    // Write to ULS
    SPDiagnosticsService.Local.WriteEvent(1, oCat, EventSeverity.Error, "Error custom message", ex.StackTrace);
}

ULS is stored in the file system in “C:\Program Files\Common Files\Microsoft Shared\web server extensions\14\LOGS”.